Ce site est en cours de reconstruction certains liens peuvent ne pas fonctionner ou certaines images peuvent ne pas s'afficher.
Anaconda
D'aprés Wikipédia :
Anaconda est une distribution libre et open source des langages de programmation Python et R appliqué au développement d'applications dédiées à la science des données et à l'apprentissage automatique (traitement de données à grande échelle, analyse prédictive, calcul scientifique), qui vise à simplifier la gestion des paquets et de déploiement. Les versions de paquetages sont gérées par le système de gestion de paquets conda.
Alors que les distributions standard utilisent pip.
Téléchargement
Se rendre sur le site d'Anaconda et dans le menu principal en haut de page choisir Products puis dans le sous-menu qui apparaît Individual Edition.
Cliquez ensuite sur le bouton Download, puis télécharger la version 64 bits (3.8 en début 2021) de Windows, MacOs ou Linux.
- pour Linux, on choisit 64-Bit (x86) Installer (529 MB), ce qui correspond au fichier Anaconda3-2020.02-Linux-x86_64.sh
- pour Windows, on choisit 64-Bit Graphical Installer (477 MB)
- pour MacOS, prendre 64-Bit Graphical Installer (440 MB)
> ./Anaconda3-2020.02-Linux-x86_64.sh

Welcome to Anaconda3 2020.02

In order to continue the installation process, please review the license
agreement.
Please, press ENTER to continue
>>>
===================================
End User License Agreement - Anaconda Individual Edition
===================================

Copyright 2015-2020, Anaconda, Inc.
....

Do you accept the license terms? [yes|no]
[no] >>> yes

Anaconda3 will now be installed into this location:
/home/richer/anaconda3

  - Press ENTER to confirm the location
  - Press CTRL-C to abort the installation
  - Or specify a different location below

[/home/richer/anaconda3] >>>
PREFIX=/home/richer/anaconda3
Unpacking payload ...

...
Preparing transaction: done
Executing transaction: done
installation finished.
Do you wish the installer to initialize Anaconda3
by running conda init? [yes|no]
[no] >>> yes
./Anaconda3-2020.02-Linux-x86_64.sh: 486: [[: not found
no change     /home/richer/anaconda3/condabin/conda
no change     /home/richer/anaconda3/bin/conda
no change     /home/richer/anaconda3/bin/conda-env
no change     /home/richer/anaconda3/bin/activate
no change     /home/richer/anaconda3/bin/deactivate
no change     /home/richer/anaconda3/etc/profile.d/conda.sh
no change     /home/richer/anaconda3/etc/fish/conf.d/conda.fish
no change     /home/richer/anaconda3/shell/condabin/Conda.psm1
no change     /home/richer/anaconda3/shell/condabin/conda-hook.ps1
no change     /home/richer/anaconda3/lib/python3.7/site-packages/xontrib/conda.xsh
no change     /home/richer/anaconda3/etc/profile.d/conda.csh
modified      /home/richer/.bashrc

==> For changes to take effect, close and re-open your current shell. <==

If you'd prefer that conda's base environment not be activated on startup,
   set the auto_activate_base parameter to false:

conda config --set auto_activate_base false

Thank you for installing Anaconda3!

===========================================================================

Anaconda and JetBrains are working together to bring you Anaconda-powered
environments tightly integrated in the PyCharm IDE.

PyCharm for Anaconda is available at:
https://www.anaconda.com/pycharm
Sous Ubuntu 20.04 et le package 2020.02 d'Anaconda installé, on dispose de nombreuses versions de Python :
> python
python              python3             python3.7m          python3-config
python2             python3.7           python3.7m-config   python3-futurize
python2.7           python3.7-config    python3.8           python3-pasteurize
Pour utiliser Python 3.8, il faut modifier le fichier de configuration .bashrc dans votre home directory :
> gedit ~/.bashrc
et lui ajouter la ligne suivante (en fin de fichier par exemple) :
alias python=python3.8
Installation de paquets
Pour installer de nouveaux paquets logiciels, on utilise conda. Dans l'exemple qui suit on installe le package numpy (Array processing for numbers, strings, records, and objects) :
Pour Linux et MacOS
On ouvre un terminal.
> conda install numpy
Collecting package metadata (current_repodata.json): done
Solving environment: done

## Package Plan ##

  environment location: /home/richer/anaconda3

  added / updated specs:
    - numpy


The following packages will be downloaded:

    package                    |            build
    ---------------------------|-----------------
    conda-4.9.2                |   py37h06a4308_0         2.9 MB
    ------------------------------------------------------------
                                           Total:         2.9 MB

The following packages will be UPDATED:

  conda                                        4.8.2-py37_0 --> 4.9.2-py37h06a4308_0


Proceed ([y]/n)? y


Downloading and Extracting Packages
conda-4.9.2          | 2.9 MB    | ################################################################################################### | 100%
Preparing transaction: done
Verifying transaction: done
Executing transaction: done
Pour Windows
Lancer Anaconda Prompt depuis le menu de Windows.
Fonctionnement avec keras et tensorflow
Pour que Python puisse fonctionner avec keras et tensorflow il faut utiliser une version 3.6 de l'interpréteur.
On crée donc un environnement nn (pour Neural Network) qui permettra de gérer ces packages spécifiques et on l'utilisera avec Spyder car il semble que Thonny génère des erreurs lors de l'utilisation de ces packages :
(base)> conda create --name nn python=3.6
(base)> conda activate nn
(nn)> conda install numpy pandas matplotlib seaborn scikit-learn statsmodels
(nn)> conda install keras
(nn)> conda deactivate
Note : l'installation de keras doit normalement provoquer l'installation de tensorflow.
Pour que Spyder puisse fonctionner avec ce nouvel environnement, il faut installer le package spyder-kernels sous les environnements base et nn :
(base)> conda install spyder-kernels
(base)> conda activate nn
(nn)> conda install spyder-kernels=1.9.4
(nn)> conda deactivate
On lance alors Spyder puis on modifie l'interpréteur depuis le menu principal en sélectionnant Tools puis Préférences
Dans la fenêtre qui s'ouvre on modifie l'interpréteur python :
- Sous Windows : C:\Utilisateurs\[monlogin]\ananconda3\envs\nn\python
- Sous Linux : /home/[monlogin]/ananconda3/envs/nn/python3.6
- Sous Mac : /Users/[monlogin]/ananconda3/envs/nn/bin/python3.6
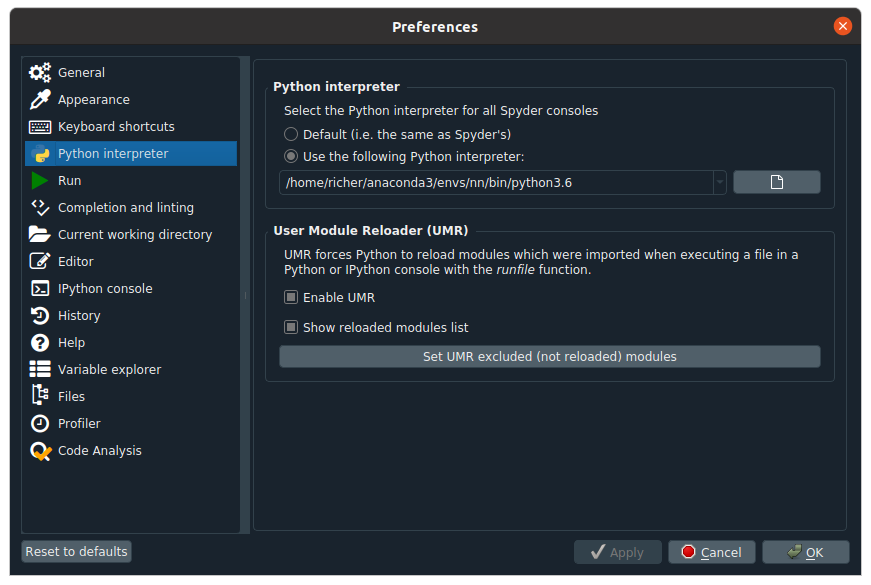
On clique sur le bouton OK, puis on relance le kernel depuis le menu principal : Consoles puis Restart kernel
Problèmes liés à Thonny
Il peut arriver que Thonny génère une erreur lors de l'utilisation de numpy.
Voir la solution sur cette page.